Our Standard Procedure for Repairing Roof Leaks Caused by Damaged Roofing Felt
Posted in :
At J and K Building Services Kent Ltd, one of the most common roofing issues we deal with across Kent is leaks caused by damaged or deteriorated roofing felt. Over time, roofing felt can become worn, torn, or perish completely—allowing rainwater to enter your loft or ceiling space and cause further damage to your property.
Below is our standard procedure for diagnosing and repairing this issue to ensure a long-lasting, watertight solution.
🔍 1. Roof Inspection and Leak Diagnosis
Every job begins with a full roof inspection, either from ground level or using safe access methods such as scaffolding or a cherry picker, depending on the property’s height and pitch.
During this stage, we:
- Identify the source of the leak
- Check for visible signs of felt damage or deterioration
- Inspect tile battens and supporting structures
- Assess the overall condition of roof tiles
🛠️ 2. Safe Access and Preparation
Once the issue is confirmed, we prepare the area for repair by:
- Setting up safe access equipment (ladder, scaffolding, or cherry picker)
- Removing any obstructions or debris from the work area
- Ensuring weather conditions are suitable for repair work
Safety is always our top priority—for both our team and your property.
🧱 3. Tile Removal
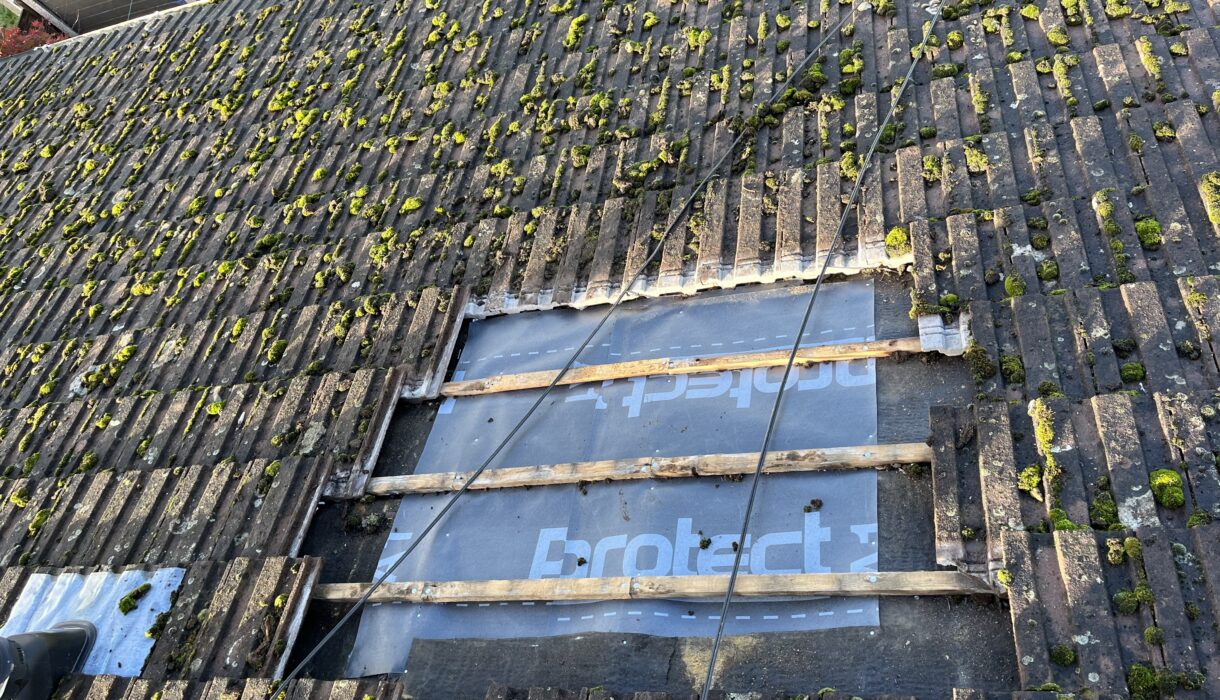
We then carefully remove the roof tiles in the affected area to gain access to the layers beneath. If the existing tiles are in good condition, we set them aside to be reinstalled later.
🔧 4. Removal of Damaged Felt and Battens
Next, we:
- Remove the tile battens to expose the old roofing felt
- Cut away and dispose of the damaged or torn felt
- Check for any signs of rot or water damage in the rafters
- Replace any compromised timber, if necessary
This step is crucial to ensure we’re not just covering up the problem but fully addressing it.
🌬️ 5. Install New Breathable Roofing Membrane
Once the area is prepped, we install a high-quality breathable roofing membrane. This modern material:
- Allows moisture from inside the roof to escape
- Prevents rainwater and condensation from entering
- Improves ventilation and energy efficiency
We make sure the membrane is correctly lapped and fixed to meet BS 5534 roofing standards.
📏 6. Fit New Treated Tile Battens
After the membrane is secure, we install new, treated tile battens, spaced and fixed according to current building regulations. These provide a solid, long-lasting base for the tiles.
🧱 7. Refit Roof Tiles
Finally, we refit the original roof tiles (or install new ones if needed), ensuring a tight, neat finish that blends in seamlessly with the rest of your roof.
✅ 8. Final Checks and Clean-Up
Before we sign off the job, we:
- Check for any gaps or loose fittings
- Ensure full watertightness
- Clean up all waste materials
- Provide photos and a breakdown of work completed (if requested)
📍 Trusted Roofing Repairs Across Kent
Our team at J and K Building Services Kent Ltd carries out roofing repairs for both residential and commercial clients across:
- Maidstone
- Ashford
- Canterbury
- Tonbridge
- Sevenoaks
- And surrounding Kent areas
📞 Need a Roof Leak Repaired?
If you’re dealing with damp patches, ceiling stains, or obvious signs of water ingress, don’t wait for the problem to get worse. Our expert team can carry out a fast, professional repair using tried-and-tested methods like the one above.
Contact J and K Building Services Kent Ltd today to book your free roof survey.
📞 07341447014
📧 [email protected]
🌐 https://www.jandkbuildingserviceskentltd.com
